Wi-Fi Remort Control

අද අපි කතා කරන්න යන්නේ Wi Fi වලින් වැඩ කරන Remort Control එක්ක් හදාගන්න විදිහ.
මේකෙ තියන විශේෂතාවය තමයි කිසිම Internet Connecting එකක් හරි වෙන Wi Fi Network එකක් හරි අවශ්ය නොවීම. ඒ කියන්නෙ ඒකට කිසිම Internet සම්බන්ධතාවක් හරි කිසිම Router එකක් හරි ඕනෙ වෙන්නෙ නැහැ.
මේකෙදි අපිම හදාගන්න Wifi Network එකක් ඇතුළෙ තමයි අපි වැඩ කරන්නෙ. ඔයාට මේ ක්රමය භාවිතා කරල ඔයාගෙ ගෙදර Light, Fan On/Off කරගන්න, Drone එකක්, Toy Car එකක් Control කරගන්න වගේ තවත් ගොඩක් දෙවල් කරගන්න පුලුවන්.
අපිට මේක හදාගන්න ඕනෙ වෙනව,
1) ESP8266 Module 2ක් ( මම මේකෙදි ගත්තෙ Nodemcu එකක් සහ Wemos D1 Mini එකක් )
Nodemcu :- http://scionelectronics.com/product/nodemcu-lua-cp2102-esp8266-wifi-internet-development-board-module/

Wemos D1 Mini :- http://scionelectronics.com/product/wemos-esp8266-esp-12-d1-mini-wifi-development-board/

2) ඊට අමතරව 4 pin Push Button එකක් :- http://scionelectronics.com/product/12x12x8mm-dip-4pin-momentary-tact-tactile-push-button-switch/
3) 5V 1 Channel Relay Module එකක් :- http://scionelectronics.com/product/5v-1-channel-relay-module/
4) Bulb එකක්
Nodemcu එක වගේම Wemos D1 Mini එකත් Warranty එකකුත් එක්කම Scion Electronics (scionelectronics.com) එකෙන් ඔයාටත් ගන්න පුලුවන්.
මොකක්ද මේ Nodemcu එක කියන්නෙ...
NodeMCU කියන්නේත් ඇත්තටම ගොඩක් හොද ඒවගේම ලාබදායි IoT platform එකක්. ඇත්ත්ටම කිව්වොත් Nodemcu කියන්නෙ esp8266 Wi Fi Chip එක මූලික කරගත්ත development board එකක්.
මේ විදිහෙ Development Board ගොඩක් තියෙනවා. NodeMCU කියන්නේ මෙයින් එකක් විතරයි. ඒ කියන්නේ ESP 1,2,3,4,5,6,7,8,9,10,11,12, 12E,12F සහ ESP32 වශයෙන් ESP modules තියෙනවා. මේ esp chip එක තමයි NodeMCU වල තියෙන micro controller එක.
ඒ කියන්නෙ අපි arduino එක program කරනකොට Atmega328 එක program වෙනවා වගේ මෙතනදීprogram වෙන්නේ මේ esp module එක. මෙතන esp එක ඇතුලේ සාමාන්ය micro controller එකට අමතරව WiFi වලට අදාල modem එකත් මේ esp chip එක ඇතුලෙම තියෙනවා. NodeMCU එකේ තියෙන්නෙත් ESP 12E කියන chip එක. ඒ වගේම මේ හැම esp module එකකම WiFi තියෙනවා. කොහොම උනත් මේ modules වලින් අපිට වැඩි පුරම භාවිත වෙන්නේ ESP-01, ESP-12 හා ESP-32 කියන modules තමයි. ඒ වගේම තමයි මේකෙදි අපි භාවිතා කරන්නෙත් ESP-12 භාවිත වෙන NodeMCU board එකක්.
අපි බලමු මේ Nodemcu එකේ Specific මොනවද කියල.
*Operating Voltage :2.5V ~ 3.6V
*Operating Current Average value: 80 mA *Operating Temperature Range : –40°C ~ 125°C
*CPU : Tensilica L106 32-bit processor
*CPU clock speed : 80MHz
*GPIOs : 17 (PWM 4)
*Analog input pin : 1
*EEPROM : 4Kb
*WiFi Protocols : 802.11 b/g/n
*Operating Current Average value: 80 mA *Operating Temperature Range : –40°C ~ 125°C
*CPU : Tensilica L106 32-bit processor
*CPU clock speed : 80MHz
*GPIOs : 17 (PWM 4)
*Analog input pin : 1
*EEPROM : 4Kb
*WiFi Protocols : 802.11 b/g/n
Nodemcu ගැන ගොඩක් අය මූලික දේවල් කියල තියනව දැක්ක ඉතින් ඒ නිසා මීට වඩා දෙයක් කියන්න යන්නෙ නැහැ.

Wemos D1 Mini කියන්නෙත් Nodemcu එක වගේම esp-12E භාවිතා වෙන Development Board එකක්.
Nodemcu එකේ වගේම Wemos D1 Mini Board එකෙත් Pin පිහිටලා තියන විදිහ රූප වල තියනවා.

ඉතින් මේ Development Board දෙකම අපිට Arduino IDE එක භාවිතා කරල Program කරගන්න පුලුවන්.
අපි NodeMCU වලින්වැඩ කරන්න කලින් අපි මුලින්ම ArduinoIDE එකට NodeMCU board එක install කරගන්න ඕනේ. ඒ කට මුලින්ම arduinoIDE එක open කරගෙන File > Preference වලට යන්න ඕනේ..
ඊට පස්සේ එන window එකේ Additional boards manager URL කියන තැන ඉස්සහින්
කියන text එක paste කරලා OK කරන්න.


මෙතන ඉදලා කරන්න ඕනෙ වැඩ ටිකට internet ඕනේ, දැන් එහෙන්ම් internet connect කරාට පස්සේ Tools > Boards > Boards manager යන්න.
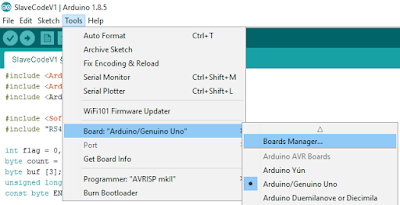

ඊට පස්සේ open වෙන Boards Manager window එකෙන් esp8266 කියන එක තෝරලා install කියන button එක Click කරන්න.


මේ විදිහට board එක install උනාට පස්සේ Tools > Boards වලදී NodeMCU board එක install වෙලා තියෙනවා බලාගන්න පුලුවන්.


මේ විදිහට කරල ඉවර වෙලා මේ පහල තියන Code දෙක Upload කරගන්න. Code එක Code එකේ Comment වලින් විස්තර කරල තියනවා.
හරි ඉස්සරල කිව්ව බඩු ටික ගත්ත නම් රූපයේ තියන විදිහට Remort එක සහ Receiver එක හදාගන්න. දැන් ඔයාටත් තියනව ඔයාටම කියල Wi Fi Remort Control එකක්.


ඒ වගේම තවත් දෙයක් කියන්නම්. ඔයාට ඕනෙම Arduino Component එකක් ලංකාවෙ ඕනෙම තැනක ඉන්න කෙනෙකුට One Day Delivery Service එකකින් ගෙදරටම ගෙන්නගන්න පුලුවන්. එහෙම නැත්නම් මාලබේ SLIT Campus එක ඉස්සරහ (071-2452926) වගේම මොරටුව Campus එක ඉස්සරහත් (071-2452696) මෙයාලගෙ Shop තියනව. ඔයාට Warranty එකක් එක්කම අපි කතා කරපු Development Board 2 ම වගකීමක් සහිතව මිළදීගන්න පුලුවන්. ඒ විතරක් නෙමෙයි ඔයාට අවශ්ය කරන ඕනෙම Arduino Component එකක් වගකීමක් එක්කම ගන්න පුලුවන් එකම තැන Scion Electronics (scionelectronics.com)


Nice information, valuable and excellent design, as share good stuff with good ideas and concepts, lots of great information and inspiration, both of which I need, thanks to offer such a helpful information,
ReplyDeletevisit this website
In the novel, Kim Powers starts with some basic facts and incidents in the lives of the two great writers and constructs a fictional, fantastical tale of what might have transpired between them during Capote’s last days. Unfortunately, what might have been a lovely and haunting story collapses under the double-team pressure of mawkishness and bad writing.
ReplyDeleteFor more info visit: jonsobel.com
To Ardhanarishwara, the blissfully turing one who resides in the third eye plexus (Ajna Chakra) of each aspirant and who denotes the union of my Param Gurudeva Bhagwan Shiva and my Param Gurudevi Maa Shakti, are offered these salutions, prior this little student continues any further with the text,
ReplyDeleteFor more info visit: Shiva